Egg yolk is a fine binder for pigment, having been used for centuries.
The process is fairly simple. Crack an egg, separate the yolk from the white, dry the yolk, puncture the yolk sack, drain into a cup. To this, add about the same volume of water. This is your binder.
Very basic demo – dip in egg/water medium, dip in pigment, swirl to mix, paint.
At the height of his fame, the Florentine painter and draughtsman Sandro Botticelli was one of the most esteemed artists in Italy. His graceful pictures of the Madonna and Child, his altarpieces and his life-size mythological paintings, such as ‘Venus and Mars’, were immensely popular in his lifetime.
At the height of his fame, the Florentine painter and draughtsman Sandro Botticelli was one of the most esteemed artists in Italy. His graceful pictures of the Madonna and Child, his altarpieces and his life-size mythological paintings, such as ‘Venus and Mars’, were immensely popular in his lifetime. source
Reginald Marsh was an American painter, renowned for his depictions of New York street life throughout the Roaring 20s and the Great Depression. ArtNet
George Tooker was an American artist known for his Social Realist tempera paintings of mid-century New York. Many of Tooker’s works, such as The Subway (1950), focused on urban loneliness and disillusionment, in which figures seen trapped by their surroundings. ArtNet
George Tooker was an American artist known for his Social Realist tempera paintings of mid-century New York. Many of Tooker’s works, such as The Subway (1950), focused on urban loneliness and disillusionment, in which figures seen trapped by their surroundings. ArtNet
“Michael Bergt has worked primarily in egg tempera for over thirty years. He co-founded The Society of Tempera Painters and served as the organization’s president for twelve years. Working primarily with the human figure, Michael’s paintings refer to a range of interests, including classical myths, sensuality, the human condition, and topical events. He is represented by Nuart Gallery in Santa Fe, New Mexico.”
“Michael Bergt has worked primarily in egg tempera for over thirty years. He co-founded The Society of Tempera Painters and served as the organization’s president for twelve years. Working primarily with the human figure, Michael’s paintings refer to a range of interests, including classical myths, sensuality, the human condition, and topical events. He is represented by Nuart Gallery in Santa Fe, New Mexico.”
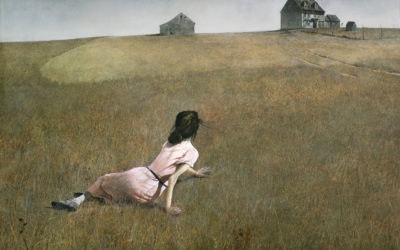
Andrew Newell Wyeth was a visual artist, primarily a realist painter, working predominantly in a regionalist style. He was one of the best-known U.S. artists of the middle 20th century.
Andrew Newell Wyeth was a visual artist, primarily a realist painter, working predominantly in a regionalist style. He was one of the best-known U.S. artists of the middle 20th century.1
“My goal as a painter is to respectfully convey something essential about my subjects, as well as make a purely pleasing feast for the eyes. I am trying, as best I’m able, to create unaffected, beautiful imagery. “
I became an artist out of my love for beauty, craftsmanship, traditional methods, and the natural world. These inspirations are fundamental to my work. My primary mediums are egg tempera and metalpoint. Both are developed gradually through many, many thoughtfully applied layers. I am suited to the meditative, persistent layering required by these mediums.
My goal as a painter is to respectfully convey something essential about my subjects, as well as make a purely pleasing feast for the eyes. I am trying, as best I’m able, to create unaffected, beautiful imagery. As I teacher, I want to share practical, effective ways of working with old-fashioned mediums and old master design with artists who, as do I, love traditional art.
Varnish serves two purposes, protection and rejuvenation of the painting’s surface. Wet paint has a relatively even surface that reflects light consistently. As the painting dries, because of absorption and evaporation, that surface becomes microscopically rougher, scattering light, making the painting look hazy and dull. Varnish evens out that surface, making it look like it did when it was wet.
Historically, varnish was made from natural resins like damar and mastic. These resins turn brown and become brittle over time. Also, they become cross-linked with the oil, making it nearly impossible to remove. Newer synthetic resins have been developed that don’t have these drawbacks. One of those resins is Regalrez 1094. Here’s a recipe adapted from research done by the National Gallery of Art in Washington, DC.
1 gram (about 50 blobs) Kraton G, pre-dissolved in ~30ml mineral spirits
optional 3 grams Cosmoloid 80H microcrystalline wax, for a satin finish
The Regalrez resin will come in a bag of small chunks. It speeds up the process if you pulverize it to a powder first. You can just put it in a heavy ziploc bag and hit it with a rubber mallet. Use a funnel or a make a paper cone to get it into a bottle or jar with the Gamsol. Shake that every few hours and it the crystals will eventually dissolve. You can then add the pre-dissolved Kraton G and Tinuvin 292.
The varnish can be brushed on. If it beads up and refuses to ‘stick’ to the painting, you can try scrubbing the varnish brush into the painting. If this won’t work, wipe the problem area with strong mineral spirits or turpentine. This beading up happens when there’s a slick surface, maybe from many oil-rich glazes. Scrubbing or wiping with a strong solvent ever so slightly roughens the surface so it’ll accept the varnish.
The recipe above generally makes a varnish that isn’t terribly glossy, depends on absorbency of the painting. If you want a satin or matte appearance, you have a few options. The easiest is to wait for the varnish to set up a bit, maybe 30 minutes, and drag a dry brush through the varnish layer to slightly disturb the surface, making it more matte. You could also add some microcrystalline wax to the varnish (Cosmoloid 80H). I prefer to varnish first with a gloss varnish to make the colors rich, then spray apply a matte varnish on top of that to adjust the sheen.
This varnish is removable with Gamsol, mineral spirits, or turpentine.
Painting 1 students varnishing their master transcriptions.
The term gesso simply refers to chalk, gypsum, or plaster. The term came to be used in the 20th century to describe a primer made from chalk and acrylic polymer emulsion. What follows is a recipe for traditional gesso made with hide glue, used in egg tempera, casein, and even oil painting.
An ounce or two of the marble dust can be replaced with Titanium Dioxide white pigment to make a brighter more opaque gesso.
Soak the powdered glue in water overnight and heat it in a double-boiler. It shouldn’t be heated more than 140° F.
Add the marble dust slowly while stirring, avoiding air bubbles. The double boiler will hold heat for quite awhile to keep the gesso workable. Put it back on the burner to warm it up if you need to.
To gesso a panel, first apply a thin layer of rabbitskin glue, same recipe as above but without the marble dust. Follow this with at least 4 thin even coats of gesso, dry between each layer. The next day, sand your panel starting with say 120 grit sandpaper, moving on up to 400 grit or so, even 1000 grit if you like for a fantastically smooth surface.